КАТЕГОРИИ:
Архитектура-(3434)Астрономия-(809)Биология-(7483)Биотехнологии-(1457)Военное дело-(14632)Высокие технологии-(1363)География-(913)Геология-(1438)Государство-(451)Демография-(1065)Дом-(47672)Журналистика и СМИ-(912)Изобретательство-(14524)Иностранные языки-(4268)Информатика-(17799)Искусство-(1338)История-(13644)Компьютеры-(11121)Косметика-(55)Кулинария-(373)Культура-(8427)Лингвистика-(374)Литература-(1642)Маркетинг-(23702)Математика-(16968)Машиностроение-(1700)Медицина-(12668)Менеджмент-(24684)Механика-(15423)Науковедение-(506)Образование-(11852)Охрана труда-(3308)Педагогика-(5571)Полиграфия-(1312)Политика-(7869)Право-(5454)Приборостроение-(1369)Программирование-(2801)Производство-(97182)Промышленность-(8706)Психология-(18388)Религия-(3217)Связь-(10668)Сельское хозяйство-(299)Социология-(6455)Спорт-(42831)Строительство-(4793)Торговля-(5050)Транспорт-(2929)Туризм-(1568)Физика-(3942)Философия-(17015)Финансы-(26596)Химия-(22929)Экология-(12095)Экономика-(9961)Электроника-(8441)Электротехника-(4623)Энергетика-(12629)Юриспруденция-(1492)Ядерная техника-(1748)
Undo the 6 bolts (arrowed) and remove the coolant pump
|
|
|
|
Undo the nut and bolt (arrowed) and remove the auxiliary belt tensioner assembly
There is no need to disconnect the fluid pipes from the pump, suspend it from the front panel/ cowling using cable ties/wire.
5 Set the engine to TDC on No 1 cylinder as described in Section 3.
6 To prevent the crankshaft from rotating whilst the crankshaft pulley central bolt is slackened, engage top gear and have an assistant press the brake pedal firmly. Slacken the pulley bolt. On automatic transmission models, it will be necessary to remove the starter motor
(Chapter 5A) and have an assistant wedge a large flat-bladed screwdriver between the driveplate teeth and the transmission casing
- ensure the screwdriver doesn't slip.
7 Check the timing marks are still aligned as described in Section 3, then slide the crankshaft pulley from the crankshaft (see illustration).
8 Undo the bolt/nut and remove the
6.10 Undo the bolts/nuts and remove the right-hand engine mounting bracket from the engine block
auxiliary drivebelt tensioner assembly (see illustration).
9 Support the engine from underneath with a jack (use a wood block on the jack, but don't place the block under the oil sump drain plug).
Note: If you're planning on removing the oilsump in addition to the timing chain, support the engine with a hoist from above.
10 Undo the bolts and remove the right-hand engine mounting bracket from the engine block (see illustration). Where applicable, disconnect the earth lead from the mounting bracket.
11 Undo the two nuts and remove the chain tensioner assembly (see illustration).
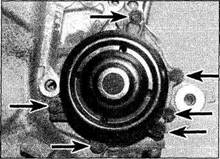
12 Undo the 6 bolts and remove the coolant pump (see illustration). Discard the coolant pump O-ring seal, a new one must be fitted.
13 Undo the bolt and remove the crankshaft position sensor from the timing cover, then undo the bolt securing the wiring loom bracket clip and move the sensor to one side.
14 Undo the bolts/nuts securing the timing cover to the engine, then use a Torx socket to remove the stud in the upper left-hand corner.
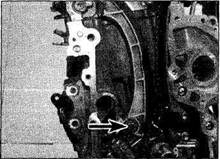
15 Use a flat-bladed screwdriver to carefully prise the timing cover away (see illustration). Take great care not to damage the sealing surfaces.
16 Note which way round it's fitted, then pull the crankshaft angle sensor plate from place. 17 Undo the bolt and remove the chain tensioner slipper (see illustration).
18 Slide the sprocket (with the chain still fitted) from the crankshaft. If it's tight, use two flat-bladed screwdrivers to ease the sprocket from place, then lift the chain from the camshaft sprockets.
19 Undo the bolts and remove the chain guide (see illustration).
20 Undo the centre bolt and remove the intake camshaft sprocket. Use a spanner on the hexagonal section of the camshaft to prevent it from rotating (see illustration).
Repeat this procedure on the exhaust camshaft sprocket. Note: The intake sprocket with the VVT-i mechanism will be locked in the 'retarded' position.
|
|
|
|
|
Дата добавления: 2014-12-23; Просмотров: 416; Нарушение авторских прав?; Мы поможем в написании вашей работы!