КАТЕГОРИИ:
Архитектура-(3434)Астрономия-(809)Биология-(7483)Биотехнологии-(1457)Военное дело-(14632)Высокие технологии-(1363)География-(913)Геология-(1438)Государство-(451)Демография-(1065)Дом-(47672)Журналистика и СМИ-(912)Изобретательство-(14524)Иностранные языки-(4268)Информатика-(17799)Искусство-(1338)История-(13644)Компьютеры-(11121)Косметика-(55)Кулинария-(373)Культура-(8427)Лингвистика-(374)Литература-(1642)Маркетинг-(23702)Математика-(16968)Машиностроение-(1700)Медицина-(12668)Менеджмент-(24684)Механика-(15423)Науковедение-(506)Образование-(11852)Охрана труда-(3308)Педагогика-(5571)Полиграфия-(1312)Политика-(7869)Право-(5454)Приборостроение-(1369)Программирование-(2801)Производство-(97182)Промышленность-(8706)Психология-(18388)Религия-(3217)Связь-(10668)Сельское хозяйство-(299)Социология-(6455)Спорт-(42831)Строительство-(4793)Торговля-(5050)Транспорт-(2929)Туризм-(1568)Физика-(3942)Философия-(17015)Финансы-(26596)Химия-(22929)Экология-(12095)Экономика-(9961)Электроника-(8441)Электротехника-(4623)Энергетика-(12629)Юриспруденция-(1492)Ядерная техника-(1748)
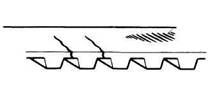
If the face of the belt is cracked or worn, check the idler pulleys for nicks or burrs
|
|
|
|
Paint marks (arrowed) on the crankshaft sprocket and the oil pump case so you can find TDC
Inspection
C... and remove the upper engine mounting bolt (arrowed)
bolt from above (see illustrations). Lower the engine, then pull the upper part of the mounting up (the rubber will allow movement) until the belt can be slipped out between the upper and lower sections of the mounting - this saves removing the mounting completely
13 If the camshaft sprocket is worn or damaged, hold the front (exhaust) camshaft with a large wrench and remove the bolt, then detach the sprocket (see Section 10).
14 Slip the timing belt off the crankshaft sprocket and remove it. If the sprocket is worn or damaged, or if you need to renew the crankshaft oil seal, remove the sprocket from the crankshaft. Before removing it, paint matching marks on the crankshaft sprocket and the oil pump case, so that you can find the TDC position without the crankshaft pulley in place (see illustration).
Caution: Do not bend, twist or turn the timing belt inside out. Do not allow it to come in contact with oil, coolant or fuel. Do not utilise timing belt tension to keep the camshaft or crankshaft from turning when installing the sprocket bolts. Do not turn the crankshaft or camshaft more than a few degrees (if necessary for tooth alignment) while the timing belt is removed.
15 If the timing belt broke during engine operation, the belt may have been contaminated or over-tightened.
Caution: If the timing belt broke during engine operation, the valves may have come in contact with the pistons, causing damage. Check the valve clearances (see Chapter 1) - bent valves usually will have excessive clearance, indicating damage that will require cylinder head removal to repair.
16 If the belt teeth are cracked or missing
(see illustration), the distributor (whereapplicable), oil pump or camshafts may have seized.
17 If there is noticeable wear or cracks on the face of the belt, check to see if there are nicks or burrs on the idler pulleys (see illustration).
18 If there is wear or damage on only one side of the belt, check the belt guide and the alignment of the sprockets (see illustration).
19 Renew the timing belt if obvious wear
or damage is noted or if it is the least bit questionable. Correct any problems which contributed to belt failure prior to belt refitting.
Note: Professionals recommend renewing thebelt whenever it is removed, since belt failure can lead to expensive engine damage.
20 Release the bolt on the belt tensioner, then remove the tensioner and its spring. Check the idler for free rotation and measure the spring's free length (see illustration). Renew the spring if it doesn't meet Specifications. Refit the tensioner and spring. On 1.3 litre engines, also check the condition of the upper idler pulley and renew it, by removing the centre securing bolt, if obvious wear or damage is noted. Fit the new idler and tighten the securing bolt to the torque listed in this Chapter's Specifications.
|
|
|
|
|
Дата добавления: 2014-12-23; Просмотров: 409; Нарушение авторских прав?; Мы поможем в написании вашей работы!