КАТЕГОРИИ:
Архитектура-(3434)Астрономия-(809)Биология-(7483)Биотехнологии-(1457)Военное дело-(14632)Высокие технологии-(1363)География-(913)Геология-(1438)Государство-(451)Демография-(1065)Дом-(47672)Журналистика и СМИ-(912)Изобретательство-(14524)Иностранные языки-(4268)Информатика-(17799)Искусство-(1338)История-(13644)Компьютеры-(11121)Косметика-(55)Кулинария-(373)Культура-(8427)Лингвистика-(374)Литература-(1642)Маркетинг-(23702)Математика-(16968)Машиностроение-(1700)Медицина-(12668)Менеджмент-(24684)Механика-(15423)Науковедение-(506)Образование-(11852)Охрана труда-(3308)Педагогика-(5571)Полиграфия-(1312)Политика-(7869)Право-(5454)Приборостроение-(1369)Программирование-(2801)Производство-(97182)Промышленность-(8706)Психология-(18388)Религия-(3217)Связь-(10668)Сельское хозяйство-(299)Социология-(6455)Спорт-(42831)Строительство-(4793)Торговля-(5050)Транспорт-(2929)Туризм-(1568)Физика-(3942)Философия-(17015)Финансы-(26596)Химия-(22929)Экология-(12095)Экономика-(9961)Электроника-(8441)Электротехника-(4623)Энергетика-(12629)Юриспруденция-(1492)Ядерная техника-(1748)
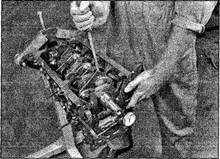
Check the crankshaft endfloat with a
|
|
|
|
Do not confuse these markings as rod numbers; they are bearing size identifications
8 After removal, reassemble the connecting rod caps and bearing shells in their respective connecting rods and install the cap nuts/bolts finger tight. Leaving the old bearing shells in place until reassembly will help prevent the connecting rod bearing surfaces from being accidentally nicked or gouged.
9 Don't separate the pistons from the connecting rods (see Section 15 for additional information).
12 Crankshaft -
 removal
Note: The crankshaft can be removed only afterthe engine has been removed from the vehicle.
It's assumed that the flywheel or driveplate, crankshaft sprocket, timing belt/chain, oil sump, oil pick-up tube, oil pump and piston/ connecting rod assemblies have already been removed. The main oil seal and housing (where applicable) must be removed from the block before proceeding with crankshaft removal.
1 Before the crankshaft is removed, check the endfloat. Mount a dial indicator with the stem in line with the crankshaft throws (see illustration).
2 Push the crankshaft fully one way and zero the dial indicator. Next, lever the crankshaft the other way as far as possible and check the reading on the dial indicator. The distance that it moves is the endfloat. If it's greater than specified, check the crankshaft thrust surfaces for wear. If no wear is evident, new thrustwashers should correct the endfloat.

dial indicator...
|
|
|
|
|
Дата добавления: 2014-12-23; Просмотров: 481; Нарушение авторских прав?; Мы поможем в написании вашей работы!