КАТЕГОРИИ:
Архитектура-(3434)Астрономия-(809)Биология-(7483)Биотехнологии-(1457)Военное дело-(14632)Высокие технологии-(1363)География-(913)Геология-(1438)Государство-(451)Демография-(1065)Дом-(47672)Журналистика и СМИ-(912)Изобретательство-(14524)Иностранные языки-(4268)Информатика-(17799)Искусство-(1338)История-(13644)Компьютеры-(11121)Косметика-(55)Кулинария-(373)Культура-(8427)Лингвистика-(374)Литература-(1642)Маркетинг-(23702)Математика-(16968)Машиностроение-(1700)Медицина-(12668)Менеджмент-(24684)Механика-(15423)Науковедение-(506)Образование-(11852)Охрана труда-(3308)Педагогика-(5571)Полиграфия-(1312)Политика-(7869)Право-(5454)Приборостроение-(1369)Программирование-(2801)Производство-(97182)Промышленность-(8706)Психология-(18388)Религия-(3217)Связь-(10668)Сельское хозяйство-(299)Социология-(6455)Спорт-(42831)Строительство-(4793)Торговля-(5050)Транспорт-(2929)Туризм-(1568)Физика-(3942)Философия-(17015)Финансы-(26596)Химия-(22929)Экология-(12095)Экономика-(9961)Электроника-(8441)Электротехника-(4623)Энергетика-(12629)Юриспруденция-(1492)Ядерная техника-(1748)
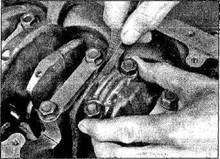
VVT-i engines. Slip sections of hose over the rod bolts before removing the pistons
|
|
|
|
Non-VVT-i engines
Slip sections of hose over the rod bolts before removing the pistons
3 If a dial indicator isn't available, feeler gauges can be used. Gently pry or push the crankshaft fully one way. Slip feeler gauges between the crankshaft and the face of the number 3 (thrust) main bearing to determine the clearance (see illustration).
4 Check the main bearing caps to see if they're marked to indicate their locations.
They should be numbered consecutively from the right of the engine to the left. If they aren't, mark them with a centre punch.
Main bearing caps generally have a cast-in arrow, which points to the right of the engine.
Loosen the main bearing cap bolts 1/4-turn at a time each, in the reverse order of the recommended tightening sequence (see illustration 20.9), until they can be removedby hand.
5 Gently tap the caps with a soft-face hammer, then separate them from the engine block. If necessary, use the bolts as levers to remove the caps. Try not to drop the bearing shells if they come out with the caps.
6 Working is the reverse of the tightening sequence (see illustration 20.12), gradually and evenly slacken and remove the bolts securing the main bearing ladder to the engine block.
7 Use a flat-bladed screwdriver to gently prise the main bearing ladder from the engine block, at the cast-in leverage points. Ensure the lower bearing shells stay in their original positions in the bearing ladder.
12.3... or a feeler gauge
2B•8 Engine removal and overhaul procedures
|
|
|
|
|
Дата добавления: 2014-12-23; Просмотров: 439; Нарушение авторских прав?; Мы поможем в написании вашей работы!