КАТЕГОРИИ:
Архитектура-(3434)Астрономия-(809)Биология-(7483)Биотехнологии-(1457)Военное дело-(14632)Высокие технологии-(1363)География-(913)Геология-(1438)Государство-(451)Демография-(1065)Дом-(47672)Журналистика и СМИ-(912)Изобретательство-(14524)Иностранные языки-(4268)Информатика-(17799)Искусство-(1338)История-(13644)Компьютеры-(11121)Косметика-(55)Кулинария-(373)Культура-(8427)Лингвистика-(374)Литература-(1642)Маркетинг-(23702)Математика-(16968)Машиностроение-(1700)Медицина-(12668)Менеджмент-(24684)Механика-(15423)Науковедение-(506)Образование-(11852)Охрана труда-(3308)Педагогика-(5571)Полиграфия-(1312)Политика-(7869)Право-(5454)Приборостроение-(1369)Программирование-(2801)Производство-(97182)Промышленность-(8706)Психология-(18388)Религия-(3217)Связь-(10668)Сельское хозяйство-(299)Социология-(6455)Спорт-(42831)Строительство-(4793)Торговля-(5050)Транспорт-(2929)Туризм-(1568)Физика-(3942)Философия-(17015)Финансы-(26596)Химия-(22929)Экология-(12095)Экономика-(9961)Электроника-(8441)Электротехника-(4623)Энергетика-(12629)Юриспруденция-(1492)Ядерная техника-(1748)
The small valve stem collets are easier to position when coated with grease
|
|
|
|
3 The engine overhaul specialist will remove the valves and springs, recondition or renew the valves and valve seats, recondition the valve guides, check and renew the valve springs, spring retainers and collets (as necessary), renew the valve seals, reassemble the valve components and make sure the installed spring height is correct. The cylinder head gasket surface will also be resurfaced if it's warped.
4 After the valve job has been performed by a professional, the head will be in like new condition. When the head is returned, be sure to clean it again before installation on the engine to remove any metal particles and abrasive grit that may still be present from the valve service or head resurfacing operations.
Use compressed air, if available, to blow out all the oil holes and passages.
10 Cylinder head reassembly

1 Regardless of whether or not the head was sent for reconditioning, make sure it's clean before beginning reassembly. Note that there are several small core plugs in the head. These should be renewed whenever the engine is overhauled or the cylinder head is reconditioned (see Section 13 for renewal procedure).
2 If the head was sent out for valve servicing, the valves and related components will already be in place.
3 Install new seals on each of the valve guides. On Non-VVT-i engines (4E-FE and 4A-FE) the intake seal lip is grey and the exhaust seal lip is black, whilst on VVT-i engines (4ZZ-FE and 3ZZ-FE) the intake seal body is grey and the exhaust seal body is black. Note: Intake and exhaust valves require different seals - DO NOT mix them up. Gently tap each intake valve sealinto place until it's seated on the guide (see illustration).
Caution: Don't hammer on the valve seals once they're seated or you may damage them. Don't twist or cock the seals during installation or they won't seat properly on the valve stems.
4 Beginning at one end of the head, lubricate and install the first valve. Apply clean engine oil to the valve stem.
5 Drop the spring seat or shim(s) over the valve guide and set the valve spring and retainer in place.
6 Compress the springs with a valve spring compressor and carefully install the collets in the upper groove, then slowly release the compressor and make sure the collets seat properly. Apply a small dab of grease to each collet to hold it in place if necessary (see illustration).
7 Repeat the procedure for the remaining valves. Be sure to return the components to their original locations - don't mix them up.
Engine removal and overhaul procedures 2B•7
11 Pistons/connecting rods
- removal

Note: Prior to removing the piston/connectingrod assemblies, remove the cylinder head, the oil sump and the oil pump pick-up tube by referring to the appropriate Sections in
Chapter 2A.
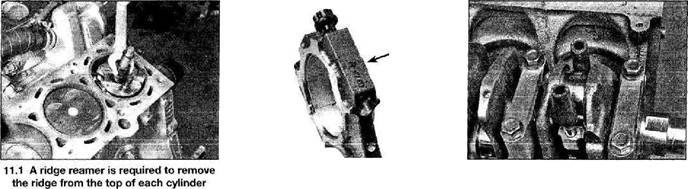
1 Use your fingernail to feel if a ridge has formed at the upper limit of ring travel (about 8 mm down from the top of each cylinder). If carbon deposits or cylinder wear have produced ridges, they must be completely removed with a special tool (see illustration). Follow the manufacturer's instructions provided with the tool. Failure to remove the ridges before attempting to remove the piston/connecting rod assemblies may result in piston damage.
2 After the cylinder ridges have been removed, turn the engine upside-down so the crankshaft is facing up.
3 Check the connecting rods and caps for identification marks. If they aren't plainly marked, use a small centre punch to make the appropriate number of indentations on each rod and cap (1, 2, 3, etc, depending on the engine type and cylinder they're associated with) (see illustration).
4 Loosen each of the connecting rod cap nuts/bolts 1/2-turn at a time until they can be removed by hand. Remove the number one connecting rod cap and bearing shell. Don't drop the bearing shell out of the cap.
5 Slip a short length of plastic or rubber hose over each connecting rod cap bolt (where applicable) to protect the crankshaft journal and cylinder wall as the piston is removed
(see illustration).
6 Remove the bearing shell and push the connecting rod/piston assembly out through the top of the engine. Use a wooden hammer handle to push on the upper bearing surface in the connecting rod. If resistance is felt, double-check to make sure that all of the ridge was removed from the cylinder.
7 Repeat the procedure for the remaining cylinders. Note: Turn the crankshaft as needed to put the rod to be removed close to parallel with the cylinder bore, ie, don't try to drive it out while at a large angle to the bore.
|
|
|
|
|
Дата добавления: 2014-12-23; Просмотров: 457; Нарушение авторских прав?; Мы поможем в написании вашей работы!