КАТЕГОРИИ:
Архитектура-(3434)Астрономия-(809)Биология-(7483)Биотехнологии-(1457)Военное дело-(14632)Высокие технологии-(1363)География-(913)Геология-(1438)Государство-(451)Демография-(1065)Дом-(47672)Журналистика и СМИ-(912)Изобретательство-(14524)Иностранные языки-(4268)Информатика-(17799)Искусство-(1338)История-(13644)Компьютеры-(11121)Косметика-(55)Кулинария-(373)Культура-(8427)Лингвистика-(374)Литература-(1642)Маркетинг-(23702)Математика-(16968)Машиностроение-(1700)Медицина-(12668)Менеджмент-(24684)Механика-(15423)Науковедение-(506)Образование-(11852)Охрана труда-(3308)Педагогика-(5571)Полиграфия-(1312)Политика-(7869)Право-(5454)Приборостроение-(1369)Программирование-(2801)Производство-(97182)Промышленность-(8706)Психология-(18388)Религия-(3217)Связь-(10668)Сельское хозяйство-(299)Социология-(6455)Спорт-(42831)Строительство-(4793)Торговля-(5050)Транспорт-(2929)Туризм-(1568)Физика-(3942)Философия-(17015)Финансы-(26596)Химия-(22929)Экология-(12095)Экономика-(9961)Электроника-(8441)Электротехника-(4623)Энергетика-(12629)Юриспруденция-(1492)Ядерная техника-(1748)
Renewal - VVT-i engines
|
|
|
|
Testing - VVT-i engines
The vacuum sensor is located on the engine compartment bulkhead
Litre 4E-FE ermine farrowed)
A Intake air temperature sensor
Renewal - Non-VVT-i engines
Testing - Non-VVT-i engines
Vacuum (MAP) sensor
Renewal - Non-VVT-i engines
Testing - Non-VVT-i engines
57 Remove the sensor as described below.
58 Connect the leads of an ohmmeter to the terminals of the sensor, and suspend the sensor in a saucepan of water.
59 Insert a thermometer into the water, then measure the temperature and resistance, and compare the readings with those shown (see illustration).
60 If the resistance is not as specified, the sensor may be faulty.
61 Disconnect the wiring plug from the sensor, located in the air cleaner cover.
62 Pull the sensor from the cover (see illustrations).
63 Refitting is a reversal of removal.
64 No testing procedure is available for the sensor. Have the engine management ECM self-diagnosis system interrogated for any stored fault codes relating to the sensor (see
Section 11).
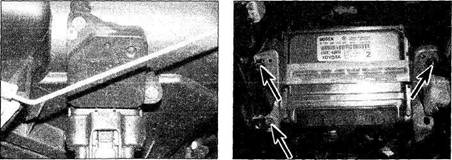
65 The sensor is located on the bulkhead at the rear of the engine compartment.
Disconnect the sensor wiring plug, and the vacuum hose (see illustration).
66 Release the wiring clip, undo the retaining bolt and remove the sensor along with the bracket.
67 Refitting is a reversal of removal.
Airflowmeter
68 Connect the leads of an ohmmeter to the terminals E2 and THA of the sensor (see illustration).
69 At -20°C the resistance across the terminals should be 13.6 to 18.4 kOhms, at 20° it should be 2.21 to 2.69 kOhms and at 60°C 0.49 to 0.67 kOhms.
70 The airflow meter is located in the air filter outlet ducting. Disconnect the sensor wiring plug (see illustration).
71 Undo the two screws, and pull the sensor from the ducting. Discard the O-ring, a new one must be fitted.
72 Fit the sensor to the ducting, using a new O-ring seal, and tighten the screws securely.
|
|
|
|
|
Дата добавления: 2014-12-23; Просмотров: 426; Нарушение авторских прав?; Мы поможем в написании вашей работы!