КАТЕГОРИИ:
Архитектура-(3434)Астрономия-(809)Биология-(7483)Биотехнологии-(1457)Военное дело-(14632)Высокие технологии-(1363)География-(913)Геология-(1438)Государство-(451)Демография-(1065)Дом-(47672)Журналистика и СМИ-(912)Изобретательство-(14524)Иностранные языки-(4268)Информатика-(17799)Искусство-(1338)История-(13644)Компьютеры-(11121)Косметика-(55)Кулинария-(373)Культура-(8427)Лингвистика-(374)Литература-(1642)Маркетинг-(23702)Математика-(16968)Машиностроение-(1700)Медицина-(12668)Менеджмент-(24684)Механика-(15423)Науковедение-(506)Образование-(11852)Охрана труда-(3308)Педагогика-(5571)Полиграфия-(1312)Политика-(7869)Право-(5454)Приборостроение-(1369)Программирование-(2801)Производство-(97182)Промышленность-(8706)Психология-(18388)Религия-(3217)Связь-(10668)Сельское хозяйство-(299)Социология-(6455)Спорт-(42831)Строительство-(4793)Торговля-(5050)Транспорт-(2929)Туризм-(1568)Физика-(3942)Философия-(17015)Финансы-(26596)Химия-(22929)Экология-(12095)Экономика-(9961)Электроника-(8441)Электротехника-(4623)Энергетика-(12629)Юриспруденция-(1492)Ядерная техника-(1748)
Lesson overview. Performing color correction
PERFORMING COLOR CORRECTION
Laboratory work 10
Review answers
Review Questions
Adding audio
All that is missing now is the audio file. You imported it earlier, so you just need to add it to the Timeline panel.
1 Drag the VO.mp3 file from the Project panel to the bottom of the layer stack in the Timeline panel.
2 Go to 0:17. With the VO.mp3 layer selected, press the [ (left bracket) key to reposition the layer to start at 0:17.
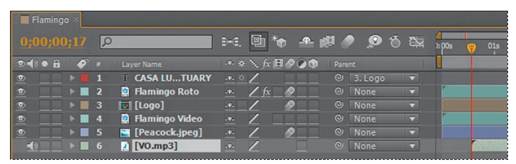
3 Choose File > Save to save the finished project.
4 Make a RAM preview to view the final project, or render it according to the process described in Lesson 14, “Rendering and Outputting.”
1 When would you use the Roto Brush tool?
2 What is the segmentation boundary?
3 How can you refine a matte you created with the Roto Brush tool?
1 Use the Roto Brush tool any time you would traditionally use roto scoping. It’s particularly useful for removing a foreground element from the background.
2 The segmentation boundary is the boundary between the foreground and background. The Roto Brush tool adjusts the segmentation boundary as you progress through the frames in the Roto Brush span.
3 You can touch up a matte using the Brush tool. To refine the edges of a matte, use the settings in the Roto Brush effect section of the Effect Controls panel.
In this lesson, you’ll learn how to do the following:
Use the Levels effect to correct the color in a shot.
Replace the sky with a different image.
Use the Auto Levels effect to introduce a color shift.
Correct a range of colors using Synthetic Aperture Color Finesse 3.
Apply the Photo Filter effect to warm portions of an image.
Remove unwanted elements with the Clone Stamp tool.
This lesson will take approximately an hour to complete. Copy the Lesson10 folder into the Lessons folder that you created on your hard drive for these projects (or create it now), if you haven’t already done so. As you work on this lesson, you’ll preserve the start files. If you need to restore the start files, copy them from the Adobe After Effects CS5 Classroom in a Book DVD.

Most shots require some degree of color correction. With Adobe After Eff ects, you can transform a dull, lifeless shot into a bright, sharp clip in no time.
|
|
Дата добавления: 2014-11-20; Просмотров: 393; Нарушение авторских прав?; Мы поможем в написании вашей работы!