КАТЕГОРИИ:
Архитектура-(3434)Астрономия-(809)Биология-(7483)Биотехнологии-(1457)Военное дело-(14632)Высокие технологии-(1363)География-(913)Геология-(1438)Государство-(451)Демография-(1065)Дом-(47672)Журналистика и СМИ-(912)Изобретательство-(14524)Иностранные языки-(4268)Информатика-(17799)Искусство-(1338)История-(13644)Компьютеры-(11121)Косметика-(55)Кулинария-(373)Культура-(8427)Лингвистика-(374)Литература-(1642)Маркетинг-(23702)Математика-(16968)Машиностроение-(1700)Медицина-(12668)Менеджмент-(24684)Механика-(15423)Науковедение-(506)Образование-(11852)Охрана труда-(3308)Педагогика-(5571)Полиграфия-(1312)Политика-(7869)Право-(5454)Приборостроение-(1369)Программирование-(2801)Производство-(97182)Промышленность-(8706)Психология-(18388)Религия-(3217)Связь-(10668)Сельское хозяйство-(299)Социология-(6455)Спорт-(42831)Строительство-(4793)Торговля-(5050)Транспорт-(2929)Туризм-(1568)Физика-(3942)Философия-(17015)Финансы-(26596)Химия-(22929)Экология-(12095)Экономика-(9961)Электроника-(8441)Электротехника-(4623)Энергетика-(12629)Юриспруденция-(1492)Ядерная техника-(1748)
Transmission
|
|
|
|
Transmission
|
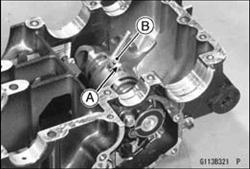
• Remove the cotter pin [A], and pull out the 3rd/4th shift fork guide pin [B].
|
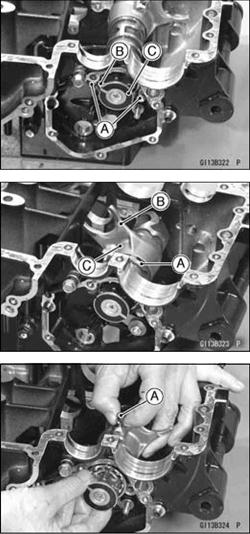
• Remove the bolts [A] holding the shift drum ball bearing [B].
• Pull out the shift drum [C] slightly, and remove the 3rd/4th shift fork. Pull the shift drum free from the crankcase.
Shift Drum and Fork Installation
• Insert the shift drum [A] into the crankcase part way, install the 3rd/4th shift fork [B] with the longer side [C] facing the neutral switch, i.e., the longer side goes onto the drum first.
• Push the shift drum in the rest of the way.
• Apply a non-permanent locking agent to the threads of the holding bolts, and tighten them.
Torque-Shift Drum Bearing Holding Bolts: 11 N-m (1.1 kgf-m, 95 in-lb)
• Put the shift fork guide pin [A] with the pin hole upward into the 3rd/4th shift fork. The guide pin rides in the middle groove of the three shift drum grooves.
• Insert a new cotter pin through the 3rd/4th shift fork and guide pin from the shorter side of the shift fork, and spread the cotter pin longer side.
9-32 CRANKSHAFT/TRANSMISSION
|
• Install the washer, spring, gear positioning lever, collar and nut.
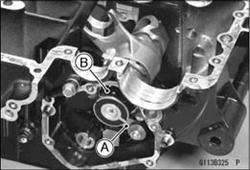
• Set the shift drum in the neutral position, that is, fit the gear positioning lever [A] into the detent on the shift drum cam [B].
|
• Install the shift shaft.
• Apply a little engine oil to the shift rod and shift fork ears. Insert the shift rod [A], running it through the shift forks [B], fitting each shift fork guide pin into the shift drum groove. The shift forks are identical, and must be installed with their longer sides [C] facing toward the external shift mechanism.
Shift Drum Disassembly
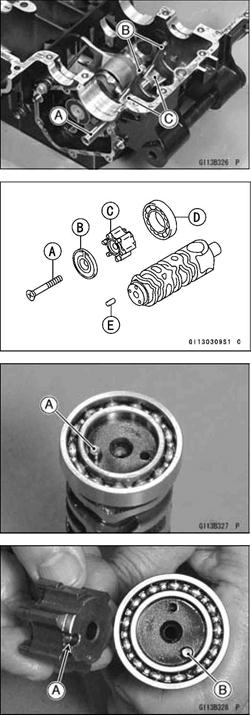
• Remove the screw [A] and the pin plate [B].
• Pull out the shift drum cam [C].
• Take off the ball bearing [D]. Pull off the dowel pin [E].
Shift Drum Assembly
• Set the dowel pin [A] into larger hole of the two which is the farthest hole from the center.
• Install the shift drum cam aligning its groove [A] with the dowel pin [B].
CRANKSHAFT/TRANSMISSION 9-33 Transmission
|
• There are six points on the shift drum cam. The highest point [A] must be fitted into the back of the pin plate [B]. If these parts are assembled in the wrong position, the neutral indicator light will not light when the gears are in neutral.
• Apply a non-permanent locking agent to the threads of the pin plate screw.
• Tighten the pin plate screw.
|
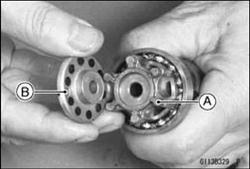
Ball and Needle Bearing Wear
• Check the following ball bearings: shift drum LH, drive
shaft RH, and output shaft LH.
OSince the ball bearings are made to extremely close tolerances, the wear must be judged by feel rather than measurement. Clean each bearing in a high flash-point solvent, dry it (do not spin the bearing while it is dry), and oil it with engine oil.
OSpin the bearing by hand to check its condition.
• If the bearing is noisy, does not spin smoothly, or has any rough spots, replace it.
• Check the following needle bearings: drive shaft LH and output shaft RH.
OThe rollers in a needle bearing normally wear very little, and wear is difficult to measure. Instead of measuring, inspect the bearing for abrasion, color change, or other damage.
• If there is any doubt as to the condition of a needle bear
ing, replace it.
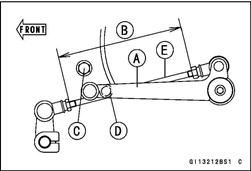
Shift Pedal Installation
• Install the shift pedal [A] adjusting the length [B] of the
shift rod [E] so that the height of the tip (a part of rubber)
of shift pedal is almost same as the one of the drive chain
guide installation lower bolt [D].
|
|
|
|
|
Дата добавления: 2014-12-23; Просмотров: 426; Нарушение авторских прав?; Мы поможем в написании вашей работы!