КАТЕГОРИИ:
Архитектура-(3434)Астрономия-(809)Биология-(7483)Биотехнологии-(1457)Военное дело-(14632)Высокие технологии-(1363)География-(913)Геология-(1438)Государство-(451)Демография-(1065)Дом-(47672)Журналистика и СМИ-(912)Изобретательство-(14524)Иностранные языки-(4268)Информатика-(17799)Искусство-(1338)История-(13644)Компьютеры-(11121)Косметика-(55)Кулинария-(373)Культура-(8427)Лингвистика-(374)Литература-(1642)Маркетинг-(23702)Математика-(16968)Машиностроение-(1700)Медицина-(12668)Менеджмент-(24684)Механика-(15423)Науковедение-(506)Образование-(11852)Охрана труда-(3308)Педагогика-(5571)Полиграфия-(1312)Политика-(7869)Право-(5454)Приборостроение-(1369)Программирование-(2801)Производство-(97182)Промышленность-(8706)Психология-(18388)Религия-(3217)Связь-(10668)Сельское хозяйство-(299)Социология-(6455)Спорт-(42831)Строительство-(4793)Торговля-(5050)Транспорт-(2929)Туризм-(1568)Физика-(3942)Философия-(17015)Финансы-(26596)Химия-(22929)Экология-(12095)Экономика-(9961)Электроника-(8441)Электротехника-(4623)Энергетика-(12629)Юриспруденция-(1492)Ядерная техника-(1748)
Wheels (Rims)
|
|
|
|
NOTE
Wheels (Rims)

|
• Insert a new cotter pin [A].
○When inserting the cotter pin, if the slots in the nut do not align with the cotter pin hole in the axel, tighten the nut clockwise [B] up to next alignment.
○It should be within 30 degree.
○Loosen once and tighten again when the slot goes past the nearest hole.
Bend the cotter pin [A] over the nut [B].
• Check the rear brake effectiveness.
• Check the rear brake light switch timing, and adjust it if necessary (see Brake Light Switch Operation Inspection in the Periodic Maintenance chapter).
Wheel Inspection
• Raise the front or rear wheel and turn it by hand to check
that it turns smoothly without making a noise.
Special Tool - Jack: 57001-1238
• If any abnormal condition is found, replace the hub bear
ing.
Spoke Inspection
• Refer to the Spoke Tightness and Rim Runout Inspection
in the Periodic Maintenance chapter.
Rim Inspection
• Refer to the Spoke Tightness and Rim Runout Inspection
in the Periodic Maintenance chapter.
|
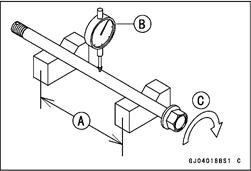
Axle Inspection
• Visually inspect the front and rear axle for damages.
• If the axle is damaged or bent, replace it.
• Place the axle in V blocks that are 100 mm (3.94 in.) [A] apart, and set a dial gauge [B] on the axle at a point halfway between the blocks. Turn [C] the axle to measure the runout. The difference between the highest and lowest dial gauge reading is the amount of runout.
• If the axle runout exceeds the service limit, replace the axle.
Axle Runout/100 mm (3.94 in.)
Standard: less than 0.1 mm (0.004 in.)
Service Limit: 0.2 mm (0.008 in.)
WHEELS/TIRES 10-9
Wheel Balance
To improve stability and decrease vibration at high speed, the front and rear wheels must be kept balanced.
Check and balance the wheels when required, or when a tire is replaced with a new one.
Balance Inspection
Remove the wheel.
• Support the wheel on a wheel balancer so that it can be spun freely.
• Spin the wheel lightly, and mark [A] the wheel at the top when the wheel stops.
ORepeat this procedure several times. If the wheel stops of its own accord in various positions, it is well balanced.
• If the wheel always stops in one position, adjust the wheel
balance.
Balance Adjustment
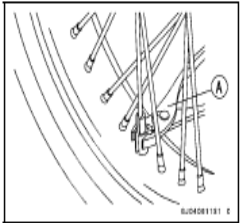
• If the wheel always stops in one position, provisionally attach a balance weight [A] on the spoke at the marking using adhesive tape.
• Rotate the wheel 1/4 turn [B], and see whether or not the stops in this position. If it does, the correct balance weight is being used.
• If the wheel rotates and the weight goes up, replace the weight with the next heavier size. If the wheel rotates and the weight goes down, replace the weight with the next lighter size. Repeat these steps until the wheel remains at rest after being rotated 1/4 turn.
• Rotate the wheel another 1/4 turn and then another 1/4 turn to see if the wheel is correctly balanced.
• Repeat the entire procedure as many times as necessary to achieve correct wheel balance.
|
• Once proper balance has been achieved, permanently install the balance weight using a pliers [A].
|
|
|
|
|
Дата добавления: 2014-12-23; Просмотров: 425; Нарушение авторских прав?; Мы поможем в написании вашей работы!