КАТЕГОРИИ:
Архитектура-(3434)Астрономия-(809)Биология-(7483)Биотехнологии-(1457)Военное дело-(14632)Высокие технологии-(1363)География-(913)Геология-(1438)Государство-(451)Демография-(1065)Дом-(47672)Журналистика и СМИ-(912)Изобретательство-(14524)Иностранные языки-(4268)Информатика-(17799)Искусство-(1338)История-(13644)Компьютеры-(11121)Косметика-(55)Кулинария-(373)Культура-(8427)Лингвистика-(374)Литература-(1642)Маркетинг-(23702)Математика-(16968)Машиностроение-(1700)Медицина-(12668)Менеджмент-(24684)Механика-(15423)Науковедение-(506)Образование-(11852)Охрана труда-(3308)Педагогика-(5571)Полиграфия-(1312)Политика-(7869)Право-(5454)Приборостроение-(1369)Программирование-(2801)Производство-(97182)Промышленность-(8706)Психология-(18388)Религия-(3217)Связь-(10668)Сельское хозяйство-(299)Социология-(6455)Спорт-(42831)Строительство-(4793)Торговля-(5050)Транспорт-(2929)Туризм-(1568)Физика-(3942)Философия-(17015)Финансы-(26596)Химия-(22929)Экология-(12095)Экономика-(9961)Электроника-(8441)Электротехника-(4623)Энергетика-(12629)Юриспруденция-(1492)Ядерная техника-(1748)
About the After Effects work area
|
|
|
|
Creating a project and importing footage
When you begin each lesson of this book, it’s a good idea to restore the default preferences for After Effects. (See “Restoring default preferences” on page 3.) You can do this with a simple keyboard shortcut.
1 Press Ctrl+Alt+Shift (Windows) or Command+Option+Shift (Mac OS) while starting After Effects to restore default preferences settings. When prompted, click OK to delete your preferences file.
2 Click Close to close the Welcome screen.
After Effects opens to display an empty, untitled project.
An After Effects project is a single file that stores references to all the footage you use in that project. It also contains compositions, which are the individual containers used to combine footage, apply effects, and, ultimately, drive the output.
After Effects offers a flexible, customizable work area. The main window of the program is called the application window. Panels are organized in this window in an arrangement called a workspace. The default workspace contains groups of panels as well as panels that stand alone, as shown below.
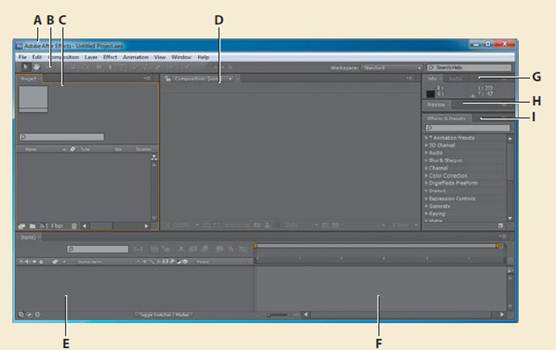
A. Application window B. Tools panel C. Project panel D. Composition panel E. Timeline panel F. Time graph G. Grouped panels (Info and Audio) H. Preview panel I. Effects & Presets panel
You customize a workspace by dragging the panels into the configuration that best suits your working style. You can drag panels to new locations, move panels into or out of a group, place panels alongside each other, and undock a panel so that it floats in a new window above the application window. As you rearrange panels, the other panels resize automatically to fit the window.
When you drag a panel by its tab to relocate it, the area where you can drop it—called a drop zone —becomes highlighted. The drop zone determines where and how the panel is inserted into the workspace. Dragging a panel to a drop zone either docks it or groups it.
If you drop a panel along the edge of another panel, group, or window, it will dock next to the existing group, resizing all groups to accommodate the new panel.
If you drop a panel in the middle of another panel or group, or along the tab area of a panel, it will be added to the existing group and be placed at the top of the stack.
Grouping a panel does not resize other groups.
You can also open a panel in a floating window. To do so, select the panel and then choose
Undock Panel or Undock Frame from the panel menu. Or, drag the panel or group outside the application window.
When you begin a project, often the first thing you’ll do is add footage to it.
3 Choose File > Import > File.
4 Navigate to the Assets folder in your AECS5_CIB/Lessons/Lesson01 folder.
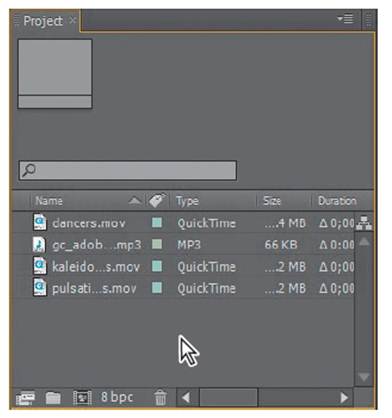
Shift-click to select the dancers.mov, gc_adobe_dance.mp3, kaleidoscope_ waveforms.mov, and pulsating_radial_waves.mov files (all the files except bgwtext.psd). Then click Open.
_ Tip: To quickly maximize a panel, position the pointer over it and press the accent grave (`) key— the unshifted character under the tilde (~) on standard US keyboards. Press the ` key again to return the panel to its original size.
A footage item is the basic unit in an After Effects project. You can import many types of footage items, including moving-image files, still-image files, still-image sequences, audio files, layered files from Adobe Photoshop and Adobe Illustrator, other After Effects projects, and projects created in Adobe Premiere Pro. You can import footage items at any time.
As you import assets, After Effects reports its progress in the Info panel.
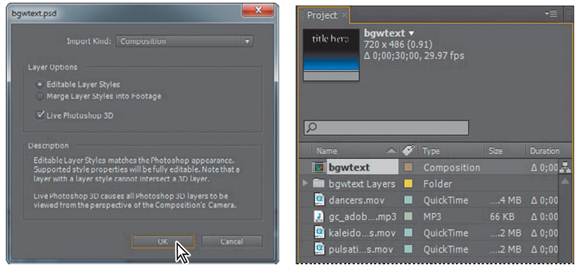
Because one of the footage items for this project is a multilayer Photoshop file, you’ll import it separately as a composition.
5 Double-click in the lower area of the Project panel to open the Import File dialog box.
_ Tip: You can also choose File > Import > Multiple Files to select files located in different folders, or drag and drop files from Explorer or the Finder. You can use Adobe Bridge to search for, manage, preview, and import footage.
6 Navigate to the Lesson01/Assets folder again, and select the bgwtext.psd file.

Choose Composition from the Import As menu, and then click Open.
After Effects opens an additional dialog box with options for the file you’re importing.
7 In the Bgwtext.psd dialog box, choose Composition from the Import Kind menu to import the layered Photoshop file as a composition. Select Editable Layer Styles in the Layer Options area, and then click OK. The footage items appear in the Project panel.
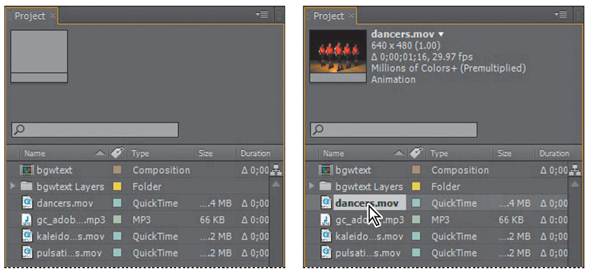
8 In the Project panel, click to select different footage items. Notice that a thumbnail preview appears at the top of the Project panel. You can also see the file type and size, as well as other information about each item, in the Project panel columns.
When you import files, After Effects doesn’t copy the video and audio data itself into your project. Instead, each footage item in the Project panel contains a reference link to the source files. When After Effects needs to retrieve image or audio data, it reads it from the source file. This keeps the project file small, and allows you to update source files in another application without modifying the project.
To save time and minimize the size and complexity of a project, import a footage item once, and then use it multiple times in a composition. In some cases, you may need to import a source file more than once, such as if you want to use it at two different frame rates.
After you’ve imported footage, it’s a good time to save the project.
9 Choose File > Save. In the Save As dialog box, navigate to the AECS5_CIB/ Lessons/Lesson01/Finished_Project folder. Name the project Lesson01_
Finished.aep, and then click Save.
|
|
|
|
|
Дата добавления: 2014-11-20; Просмотров: 794; Нарушение авторских прав?; Мы поможем в написании вашей работы!