КАТЕГОРИИ:
Архитектура-(3434)Астрономия-(809)Биология-(7483)Биотехнологии-(1457)Военное дело-(14632)Высокие технологии-(1363)География-(913)Геология-(1438)Государство-(451)Демография-(1065)Дом-(47672)Журналистика и СМИ-(912)Изобретательство-(14524)Иностранные языки-(4268)Информатика-(17799)Искусство-(1338)История-(13644)Компьютеры-(11121)Косметика-(55)Кулинария-(373)Культура-(8427)Лингвистика-(374)Литература-(1642)Маркетинг-(23702)Математика-(16968)Машиностроение-(1700)Медицина-(12668)Менеджмент-(24684)Механика-(15423)Науковедение-(506)Образование-(11852)Охрана труда-(3308)Педагогика-(5571)Полиграфия-(1312)Политика-(7869)Право-(5454)Приборостроение-(1369)Программирование-(2801)Производство-(97182)Промышленность-(8706)Психология-(18388)Религия-(3217)Связь-(10668)Сельское хозяйство-(299)Социология-(6455)Спорт-(42831)Строительство-(4793)Торговля-(5050)Транспорт-(2929)Туризм-(1568)Физика-(3942)Философия-(17015)Финансы-(26596)Химия-(22929)Экология-(12095)Экономика-(9961)Электроника-(8441)Электротехника-(4623)Энергетика-(12629)Юриспруденция-(1492)Ядерная техника-(1748)
Correcting a range of colors
|
|
|
|
You’ve corrected the overall color for the scene, but you can also enhance a specific area as a secondary color correction. In this shot, the color correction caused the grass in front of the building to look like a mature bluegrass instead of a welcoming green lawn. To shift the grass to green, you will use the Synthetic Aperture Color Finesse 3 effect, a third-party plug-in that installs with After Effects and offers the capability to isolate a color range and adjust only those colors.
Color Finesse 3 applies its effect to the original layer, ignoring any effects. Because you’ve already performed some color correction, you’ll precompose the layer to include the results of the effects you’ve already applied.
_ Note: Synthetic Aperture Color Finesse 3 is a powerful colorcorrection plug-in. Once you’re familiar with it, you can use it toperform a wide variety of color corrections.
1 Select the Building layer in the Timeline panel, and then press Ctrl+D (Windows) or Command+D (Mac OS) to duplicate the layer.
2 With the duplicate layer (Building 2) selected, chooseLayer > Pre-compose.
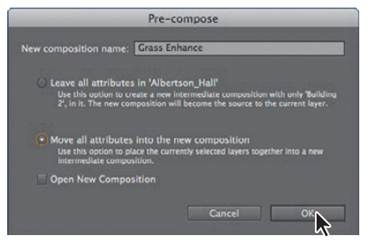
3 In the Pre-compose dialog box, name the new composition Grass Enhance, select Move All Attributes Into The New Composition, and click OK.
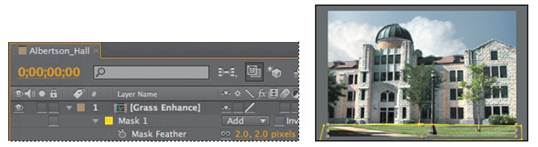
You’ve created the precomposed layer, so you’ll retain the color-correction effects you’ve applied. However, to avoid any issues with the cloning you performed to remove the lamppost, you’ll mask the grass area. The mask will ensure that only the grass is affected.
4 With the Grass Enhance layer selected in the Timeline panel, select the Pen tool () in the Tools panel. Click around the grass area to create a mask.
5 With the Grass Enhance layer still selected in the Timeline panel, press the F key to display the Mask Feather property, and change the amount to 2, 2 pixels. Feathering blends the layers more naturally.
6 Press the F key again to hide the Mask Feather property.
Now you’re ready to use Color Finesse 3.
7 With the Grass Enhance layer selected, choose Effect > Synthetic Aperture > SA Color Finesse 3.
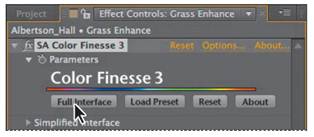
8 In the SA Color Finesse 3 area of the Effect Controls panel, click Full Interface. SA Color Finesse 3 opens in its own window.
_ Note: SA Color Finesse 3 may prompt you to enter a serial number. Use the one provided in your software package.
9 Check the box in the Secondary tab to activate secondary color correction, and then click the Secondary tab itself to open its color-correction controls.
SA Color Finesse 3 enables you to perform up to six different secondary color correction operations. You’ll need only one for this project, however.
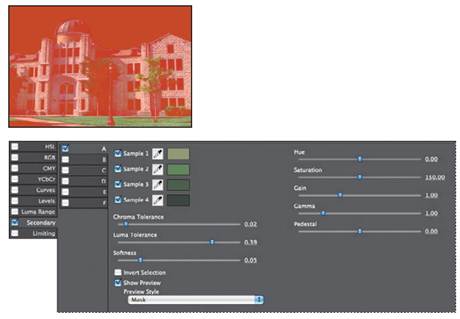
10 Check the box on the A tab, where you’ll perform the color correction.
11 Using the four Sample eyedroppers, click to collect four color samples in the grass area. Try to sample various shades of green from light to dark; zoom in if necessary to help you select a range of hues.
Four samples don’t encompass the entire contrast range of the grass, but SA Color Finesse 3 has controls to refine the color selection.
12 Still on the A tab, choose Mask from the Preview Style menu, and then select Show Preview. Now you can see the areas that are selected and those that are masked (shaded in red).
13 Adjust the Chroma Tolerance, Luma Tolerance, and Softness sliders until all of the grass is selected. It’s okay if trees or shrubs are selected; the mask you applied earlier ensures that those adjustments will not appear in the final composition.
14 Increase the Saturation amount to 150.
15 Deselect Show Preview, and then click OK to apply the correction and to close the SA Color Finesse 3 window.
16 Choose File > Save to save your work.
_ Note: To learn more about SA Color Finesse 3, within the plug-in’s interface, choose Help > View Color Finesse User’s Guide or Help > View Color Finesse Online Knowledge Base.
|
|
|
|
|
Дата добавления: 2014-11-20; Просмотров: 482; Нарушение авторских прав?; Мы поможем в написании вашей работы!