КАТЕГОРИИ:
Архитектура-(3434)Астрономия-(809)Биология-(7483)Биотехнологии-(1457)Военное дело-(14632)Высокие технологии-(1363)География-(913)Геология-(1438)Государство-(451)Демография-(1065)Дом-(47672)Журналистика и СМИ-(912)Изобретательство-(14524)Иностранные языки-(4268)Информатика-(17799)Искусство-(1338)История-(13644)Компьютеры-(11121)Косметика-(55)Кулинария-(373)Культура-(8427)Лингвистика-(374)Литература-(1642)Маркетинг-(23702)Математика-(16968)Машиностроение-(1700)Медицина-(12668)Менеджмент-(24684)Механика-(15423)Науковедение-(506)Образование-(11852)Охрана труда-(3308)Педагогика-(5571)Полиграфия-(1312)Политика-(7869)Право-(5454)Приборостроение-(1369)Программирование-(2801)Производство-(97182)Промышленность-(8706)Психология-(18388)Религия-(3217)Связь-(10668)Сельское хозяйство-(299)Социология-(6455)Спорт-(42831)Строительство-(4793)Торговля-(5050)Транспорт-(2929)Туризм-(1568)Физика-(3942)Философия-(17015)Финансы-(26596)Химия-(22929)Экология-(12095)Экономика-(9961)Электроника-(8441)Электротехника-(4623)Энергетика-(12629)Юриспруденция-(1492)Ядерная техника-(1748)
Creating the 3D floor
|
|
|
|
Building a 3D object
Importing assets
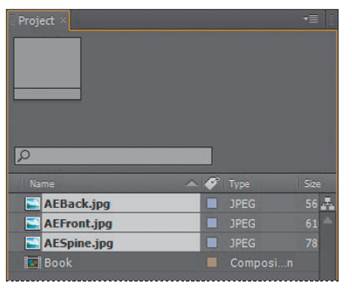
You’ll use three Photoshop files in this project: images of the front cover, back cover, and spine of the book.
1 Double-click an empty area of the Project panel.
2 In the Import File dialog box, navigate to the AECS5_CIB/ Lessons/Lesson11/Assets folder.
3 Shift-click to select the AEBack.jpg, AEFront.jpg, and AESpine.jpg files, and then click Open.
In order to move the book in 3D space, you’ll need to create the 3D object. You’ll build it piece by piece. Initially, any layer is flat, with only x (width) and y (height) dimensions and can be moved only along those axes. But all you have to do to move a layer in three dimensions is to turn on its 3D Layer switch. With that switch on, you can also manipulate the object along its z axis (depth).
Before you build the book, you’ll create an environment to help you work in perspective.
A grid layer, serving as a floor for the 3D space, can help you maintain perspective.
1 Click in the Timeline panel to make it active.
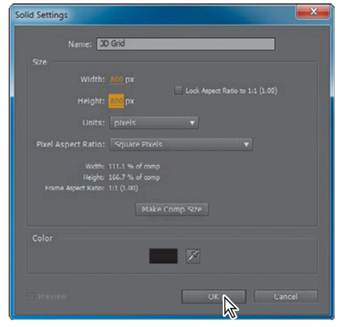
2 Choose Layer > New > Solid.
3 In the Solid Settings dialog box, name the layer 3D Grid.
4 Enter 800 pixels for the Width and the Height, and then click OK to create the layer.
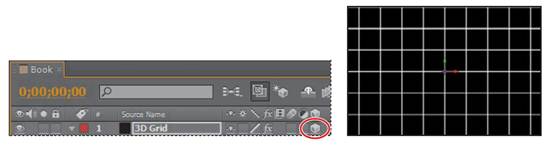
5 With the 3D Grid layer selected in the Timeline panel, choose Effect > Generate > Grid.
The Effect Controls panel displays the Grid effect properties. You can customize the grid if you want to, but the default settings will work for this lesson. The grid is simply to help you see objects in perspective as you work.
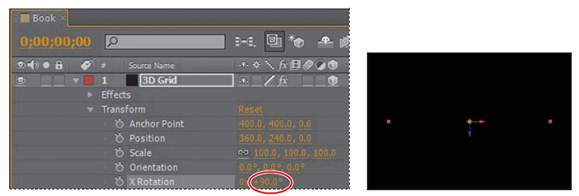
6 In the Timeline panel, expand the 3D Grid Transform properties. The Position property is 360, 240, the center of the composition. Whenever you add an element to the Timeline panel, its anchor point will be at this center point.
_ Note: Material Options properties specify how the layer interacts with light. You’ll work with the Material Options property group in Lesson 12, “Using 3D Features.”
7 In the Timeline panel, select the 3D Layer switch () for the 3D Grid layer to give the layer three dimensions.
Three 3D Rotation properties appear in the Transform group for the layer, and properties that previously supported only two dimensions now display a third value for the z axis. In addition, a new property group named Material Options appears.
A color-coded 3D axis appears over the layer’s anchor point in the Composition window. The red arrow controls the x axis, the green arrow controls the y axis, and the blue arrow controls the z axis. At the moment, the z axis appears at the intersection of the x and y axes. The letters x, y, and z appear when you position the pointer over the corresponding axis. When you move or rotate the layer while the pointer is over a particular axis, the layer’s movement is restricted to that axis.
8 In the Timeline panel, change the X Rotation angle to 90 degrees. The grid seems to disappear, but don’t worry—it’s still there!
|
|
|
|
|
Дата добавления: 2014-11-20; Просмотров: 402; Нарушение авторских прав?; Мы поможем в написании вашей работы!