КАТЕГОРИИ:
Архитектура-(3434)Астрономия-(809)Биология-(7483)Биотехнологии-(1457)Военное дело-(14632)Высокие технологии-(1363)География-(913)Геология-(1438)Государство-(451)Демография-(1065)Дом-(47672)Журналистика и СМИ-(912)Изобретательство-(14524)Иностранные языки-(4268)Информатика-(17799)Искусство-(1338)История-(13644)Компьютеры-(11121)Косметика-(55)Кулинария-(373)Культура-(8427)Лингвистика-(374)Литература-(1642)Маркетинг-(23702)Математика-(16968)Машиностроение-(1700)Медицина-(12668)Менеджмент-(24684)Механика-(15423)Науковедение-(506)Образование-(11852)Охрана труда-(3308)Педагогика-(5571)Полиграфия-(1312)Политика-(7869)Право-(5454)Приборостроение-(1369)Программирование-(2801)Производство-(97182)Промышленность-(8706)Психология-(18388)Религия-(3217)Связь-(10668)Сельское хозяйство-(299)Социология-(6455)Спорт-(42831)Строительство-(4793)Торговля-(5050)Транспорт-(2929)Туризм-(1568)Физика-(3942)Философия-(17015)Финансы-(26596)Химия-(22929)Экология-(12095)Экономика-(9961)Электроника-(8441)Электротехника-(4623)Энергетика-(12629)Юриспруденция-(1492)Ядерная техника-(1748)
Positioning 3D elements
|
|
|
|
Importing 3D images from Adobe Photoshop Extended
Adobe Photoshop Extended can import and manipulate 3D models in several popular formats. You can manipulate these models in Photoshop Extended, and then save one or more frames as PSD files for import into After Effects.
Alternatively, you can use the Vanishing Point feature in Photoshop Extended to create 3D images, and then use the Export For After Effects command to save the results as a collection of PNG files—one for each plane—and a VPE (Vanishing Point Exchange) file that describes the geometry of the scene. When you import the VPE file, After Effects uses its information to re-create the scene as a composition containing a camera layer and one perspective-corrected 3D layer for each PNG file.
When you build a 3D object, you need to position the 3D layers in relationship to each other. You’ll position the spine of the book by moving its anchor point and then adjusting the front cover as necessary.
1 Drag the AESpine.jpg item from the Project panel into the Timeline panel, placing it at the top of the layer stack.
2 Select the 3D Layer switch () for the AESpine.jpg layer.
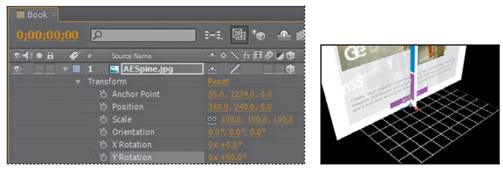
3 Ctrl-click (Windows) or Command-click (Mac OS) the triangle in the Label column for the AESpine.jpg layer to display all of its Transform properties.
4 Click the y-axis value (the middle value) for the Anchor Point property, and then add *2, so that its value is 617*2. Press Enter or Return to accept the calculation.
As with the front cover, moving the anchor point for the spine positions it to sit on the floor of the 3D space. However, the spine is facing the same direction as the front cover. You’ll need to rotate it.
5 Change the Y Rotation property for the AESpine.jpg layer to +90.
Now the spine is facing the right direction, but it’s in the middle of the front cover. To move it into place, you’ll use the same simple math trick you used to position the book on the floor.
6 Select the AEFront.jpg item in the Project panel, and note its width. It’s exactly 1000 pixels wide.
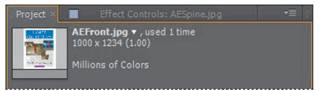
The AESpine.jpg layer currently intersects the middle of the AEFront.jpg layer. Therefore, moving the spine 500 pixels to the left will align it appropriately. To move an object to the left on the x axis, subtract pixels.
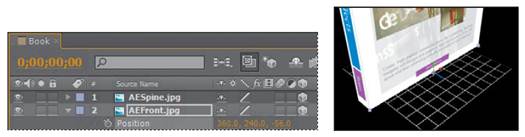
7 In the Timeline panel, click the x-axis value (the first value) for the Position property, and then append -500 to the value, so the new value is 360.0-500. Press Enter or Return.

The spine moves to the end of the book. It’s close, but it protrudes from the front of the book. You’ll move the AEFront.jpg layer forward to fix that.
8 In the Timeline panel, select the AEFront.jpg layer, and then press P to display its Position property.
9 Click the z-axis value (the third value) for the Position property of the AEFront.jpg layer, and change the value to -56. A negative value on the z axis moves the layer toward the active camera view (forward).
10 Close all properties for the AESpine.jpg and AEFront.jpg layers to keep the Timeline panel neat.
|
|
|
|
|
Дата добавления: 2014-11-20; Просмотров: 377; Нарушение авторских прав?; Мы поможем в написании вашей работы!